Khali:
1.Get the IP Address of your Metaspoitable VM and put it into the URL of fire fox.

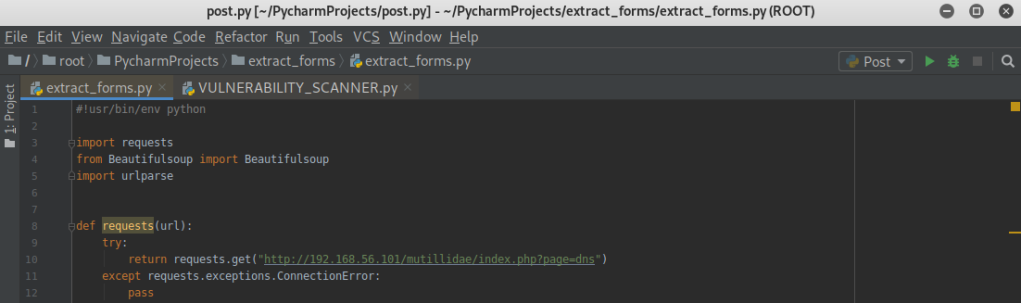
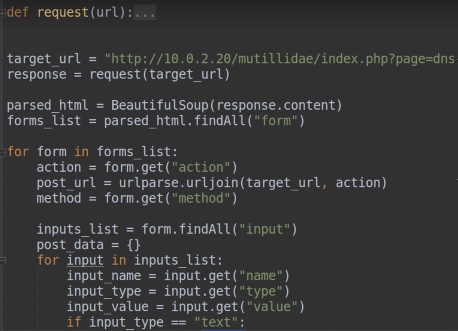
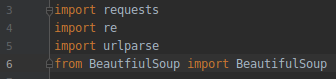
2.Create a file called “Extract_forms.py” and copy the coding.Which is a module using beautiful soup to extract useful information for the HTML page.
3.Click the link if beautiful soup doesn’t work. As you probably will need to install PYTHON-BS4. https://www.crummy.com/software/BeautifulSoup/bs4/doc/

4.I already showed you the URL of the page, when i told you to copy the coding.
5.If we run “Extracts_forms.py” you will see that we can get all the HTML files.


6.Now right click and inspect elements, the only parts we need is the highlighted area.


7.After we are going to get the forms and return a list with each element on the page. Then run the program, and as you can see we have the form,action,method and the inputs.

8.Now extract the HTML attributes from the tables and rows. You will see that the address on the action is the same URL as the one on the page. This isn’t guaranteed every time.

9.After extract the HTML attributes from the tables and rows

10.Create a loop with the forms list. You can extract anything from forms to actions. Therefore extract the actions. After making a variable “action” can command it to get the action form.

11.We need the method. Run this after creating a method variable, after we will get “post”

12.We now need the names of the inputs. And we need to write the same syntax as before.

13.Now if you run we will need to the the input names.

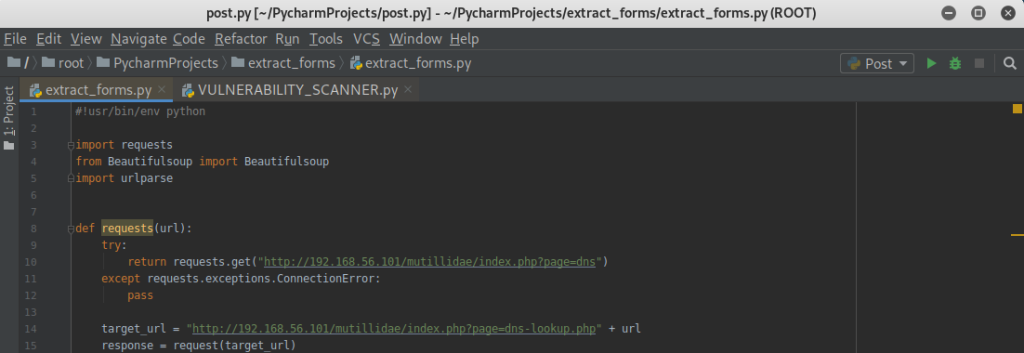
14.Join the two URL’s (target and variable action).

15.Run the program and you should have the full URL to post to form.

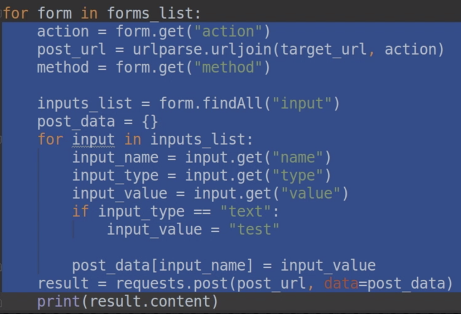
16.Now create a dictionary and loop.Delete all the 3 prints commands to create the loop.

17.Now submit the form with the “request.post” using the URL parse and data dictionary.

18.Run the code you can see this is the results for the test.This means we have set the value of the input box to test and submit the form and the web application accepted the form.

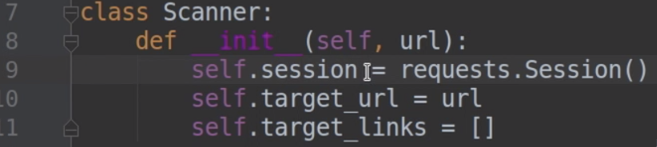
19.Create a new file (“Scanner.py”).

20.And create another file called “vulnerability_scanner.py”.

21.After you have created a variable for URL you need a program to search all the pages of a website.And you need a crawler program.

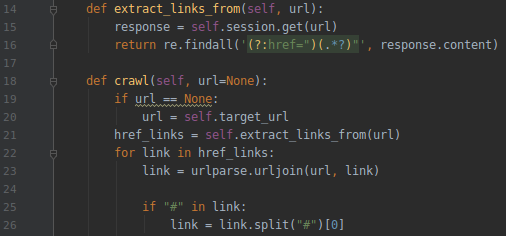
22.We have to modify so that the class method can take “self” as the first argument.Import “re” and call the “extract_links” method in the class to “self”, but remove it from the brackets.

23.We have to fix “crawl.” We need to import the URL parse and add “self” to whenever “target_URL” is.

24.Now we will set “vuln_Scanner=scanner.scanner.”Next create a variable “target_URL” with the website URL and include it as an input for our scanner.

25.Create a default value for an argument.By adding the “none” value. This will set the value for the “URL” to none.
26.Run the code and this is what it should look like!

27.This is a new feature to our crawler and send “request” in a session.
28.Change “request.post to “session.post”. And delete “import request”.

29.Create a new variable called “links_to_ignore”.

30.The program to extract forms, copy and paste into the scanner. And import beautiful soup
31.Copy and paste the values,inputs and the URL form that we have already created.
32.Change the “target_URL” to “URL”, and change “test” to “value” in “input_value” and return the result instead of “=” it.

33.We are storing the “method” variable.
34.Set security to low under “xxs reflected”.

35.Now we will use “beef hook URL” so everybody that visits that page will be hooked to beef and we can run any commands beef has to offer. Download “beef xxs framework” if you don’t have it. Copy the script to inject it onto a web page like you did with the alert script.

36.Bypass and modify the “max length” from 50 to 500 and include the full IP address. If you don’t know your IP address you can run “ifconfig” from a terminal. After sign the guest room.

37.Change the security from high to medium!

38.Send a request to form submitting this value as the input.

39.It didn’t work. It says “Hello world!”

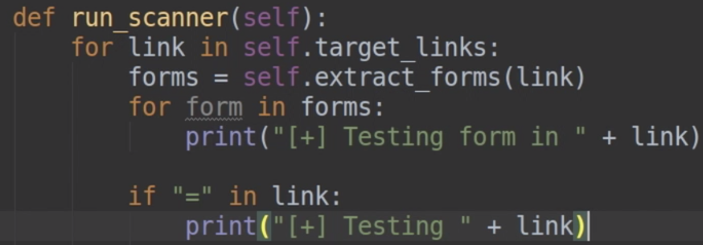
40.This is what your vul_scanner should look like.

41.Copy and paste the highlighted part of your code over to modify a few things to get it to work.The parameter will pass the value we give after the equal to the web application.

42.Copy and paste highlighted part.

43. Now we have to change “test_xxs_in_form” to “test_xxs_in_link”.Delete “forms and “print (forms). As we are not using forms anymore and replace the URL link with one with “test” added at the end from the “xxs reflect” web page.

44.Run the code, you will see it comes back with “true”. I we go to a separate web page like “file inclusion” and run it,you will see, it comes back with none.

45.We can neaten up our code by deleting the “return true” and the call. Python will now evaluate whether “test_test_script” is in the “response.content” variable and tell us if it is “true” or “false”.

46.Now we add the last of our codes.

47.Create a new variable “is_vulnerable_to_xss” equals “self.test_xss_in_forms” and “(form)” as the input and “(link)” as the link. Then if it is “vulnrable_to_xxs to print a message saying “xxs discovered in link and in the following form. Now do the same for “id:”=” in link” and add (“\N\N”) two new characters so it is easy to find it in the output.

48.Now delete the highlighted area as it is useless.

49.If you run your scanner, you will as see it work perfectly and automatically is crawling.

50.And you’re done!
Physical Security:
Picture having flawless cyber security and network security, and you don’t have nothing to save it physically. We can use such items as finger / eye / face scanners or voice recognition to keep our organisation secure. The college-like ID cards are also a good idea to sign in and out of networks. And we can add some guardians besides all this.
But our physical safety is going to be pretty good. How good and not perfect? Because no system can’t be hacked. That’s why we need guardians, but even guardians will betray us because we can hire a person who will let hackers come in by accident.

So the best thing we can do is to have just one of these “fingers , eyes , face or voice recognition” because if we include all of them in our organisation hackers will have more opportunities to join, that’s why we need to include no more than guardians + 2 options, such as fingerprinting and signing in / out systems.
Software and Network Security:
They may use numerous authentication methods, such as RSA and its partner AES, which is one of the best encryption techniques. One of the world’s most powerful methods of authentication is the RSA encryption algorithm. This allows incredible key sizes, and 2048- and 4096-bit keys are popular for browsing. RSA is an algorithm for asymmetric encryption. This means two different encryption keys are available. Another encrypts data and is available to all to see. The other will, and is personal, decrypt the information.

Encryption is the method of encoding a document or data so that the files can only be reached by authorised users. There are 2 encryption types, Symmetric and Asymmetric. Asymmetric Encryption requires a pair of keys, such as public and private keys, to improve security, such as when you deliver a public key encrypted message and the recipient decrypts it using a private key.

We can use both public and private keys for computer and network security. What’s the difference from each other? Public keys refer to Asymmetric Encryption, which can be used to send somebody secure messages. It can only be used to encrypt messages. Personal keys also apply to both encryption types, as well as symmetric and asymmetric. As a secret key, it’s also known. A coded messa can be decrypted.

Storage server Network are some workstations that do not have individual hard drives and rely on a network, each file is saved on a network and distributed.
Backups are used to collect and store a backup of computer data in one location. It’s a good tool against data loss, because if we save everything on a backup from our device, we like to give our machine a second life in case of data loss, we can just replace the backup from a computer with the one with all the information on it.

Audit Log is a document with the function of recording an event from a system, showing which files have been accessed.

Handshaking is the communication between two routers and the resulting agreement on which protocol to use that precedes each telephone link, when you make a dial-out call from your computer, you can hear handshaking.

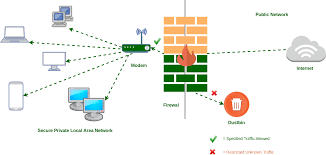
Firewall is the system of network security designed to prevent unauthorised access from or to a private network.
Virtual Private Network is a network designed using shared cables to connect remote users or regional offices to the private, internal network of a corporation. VPN helps you to create a secure internet connection to another network. It can be used to access region-restricted websites, shield from prying eyes on public Wi-Fi from your browsing activity.

Virus checking software or Anti Virus software is just a simple way to keep it safe for everyone on their computer. It was developed for detecting and removing viruses from computers or even not allowing the viruses to enter. There are a lot of antiviruses today, I think you’re going to find one you want.

Passwords and data access rates. There are more rates of data access, but both public and private are the common ones. Public rate is like a novel, but only for those in the library, and it’s from an organisation for everyone. So private rate is like buying a book, and you can just read it because it’s yours, and everybody in the business has their wallet, or something like that, and they have passwords.

Updating technology is a very important thing because if we don’t upgrade applications as soon as possible after the new update, it can create certain issues.

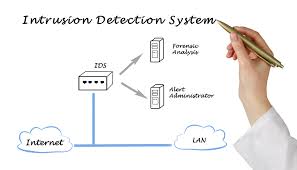
An Intrusion Detection Device is a device that monitors network traffic for suspicious activity and alerts when discovering such activity. It is a software application that checks a malicious activity or rule violation network or system.
Disaster recovery is a safety preparation field aimed at protecting an enterprise from the consequences of major negative incidents. It allows an organisation to maintain mission-critical functions after a disaster or to resume them quickly.

And, after all that I described, we now have some suggestions on how our business might prevent a catastrophe. I have already said what we can do and how we can use physical security. And with computer and network security, we’ve got to do the same.

First of all we need an antivirus, I’d recommend that you use ESET, Full AV, Avast, AVG, Kaspersky or MalwareBytes, I believe these are the best versions you can use. We will also need to use FireWall and VPN, guaranteeing safe internet navigation. Of course, with some backup support, we will need to make a copy of all our information and documents. We will also set a high level of security for accessing data, and our apps will always have the latest updates. And we’re going to use an Intrusion Detection Program to see all the odd things going on. You can also use the rest of the above, but it all depends on your company and what you want to do.

But in case we need a plan B if a disaster occurs. Replacement of the entire system. This must be avoided at all costs. If this occurs, this means that you either have not expected or witnessed an unexpected relative catastrophe. Many companies will have a contract called “dark site” that will be hired to duplicate the business system when the system fails.
![Image result for reasons for disaster recovery]](https://gabrielhirb.wordpress.com/wp-content/uploads/2019/11/image-15.png?w=275)
How to hack VM (Mirai step by step):
1. Nmap

2. Examining some odd behavior. Nmap different result than browser (blocked).

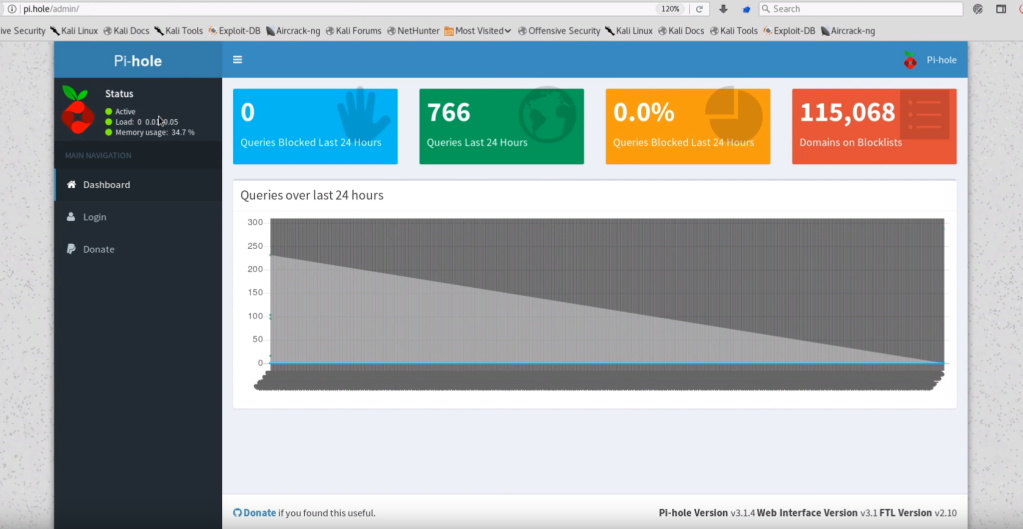
3. Getting to /admin and testing for Zone Transfer. This is what it should look like.
4. Testing SSH Default Raspberry Pi Creds. Managed to log in.

5. Escalate to root ‘sudo su’. However the root.exe isn’t there.

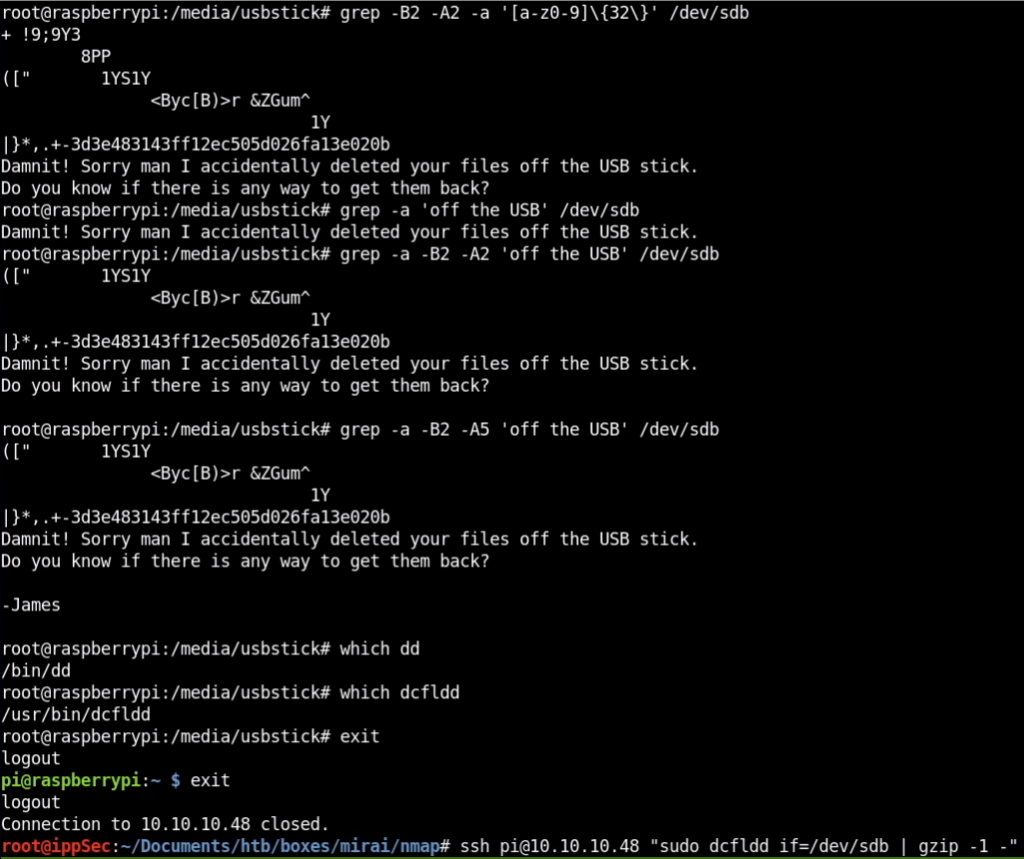
6. Recovering the deleted root.txt
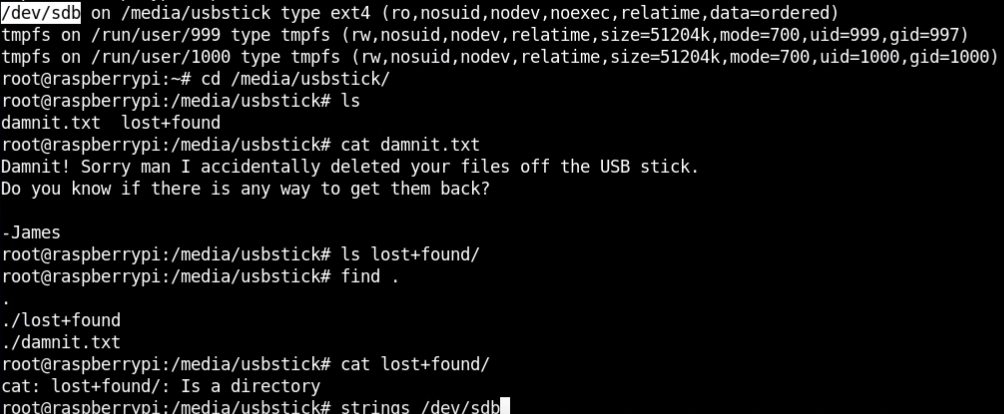
7. GrepFu

8. Downloading /dev/sdb via SSH.
9. Running Binwalk against it.

10. Trying to recover with TestDisk.


11. Trying to recover with PhotoRec.

12. You have finished, enjoy your hacking!
